When I started Zwifting I felt like there was a lot that was not obvious to new users. Zwift itself doesn’t tell you about a lot of these features when you download and install it for the first time, and unless you go do some research on the internet yourself you may not ever know about this stuff.
I originally wrote all of this up and sent it to my teammates when they were first getting started with Zwift, but with everyone being quarantined lately I figured some other people might find this helpful too.
Without further ado, here’s the Zwift Basics: aka Things I Wish I Had Known When I Started Zwifting

Hardware
I won’t go too in depth about hardware but I’ll talk about my setup and why I chose the pieces I did, and mention some inferior options you might want to steer clear of.
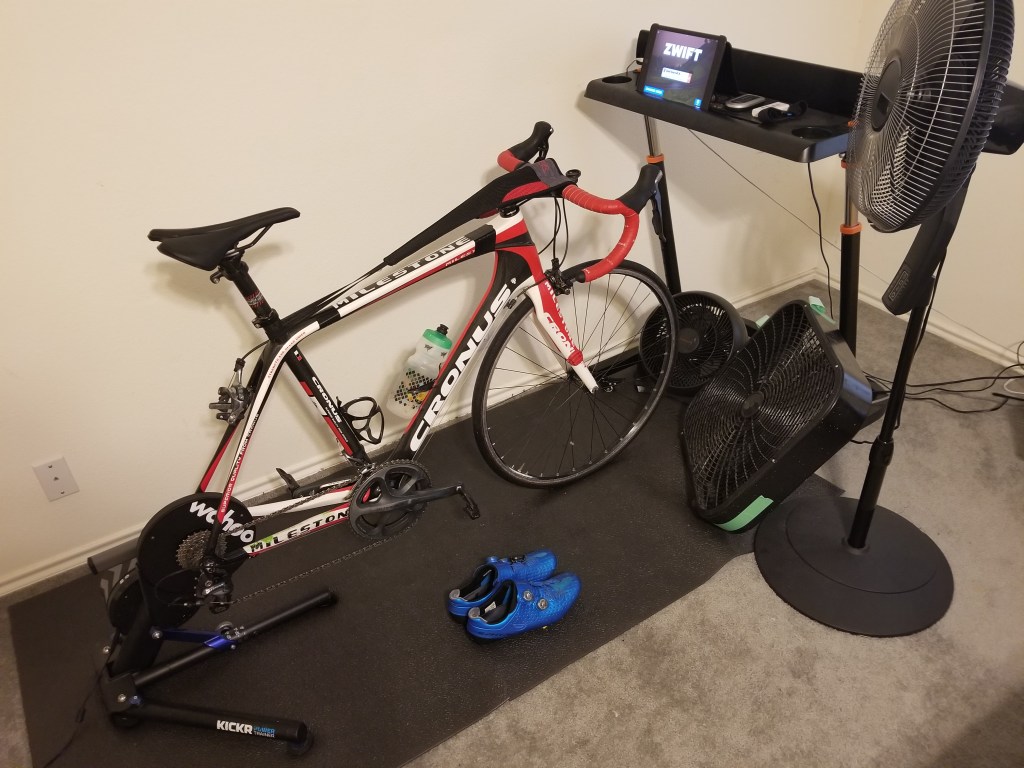
Power Measuring Device: (Like a smart trainer or power meter). I have a Wahoo Kickr and I like it. You can find deals on used Kickrs in the $500-$1000 range depending on the generation. Gen 1 didn’t have a grey handle, Gen2 and Gen3 do. Generally the later the generation the Kickr is, the larger flywheel it will have, the more accurate the power is, the quieter it is, and more compatible with newer features like the Kickr Climb it is. Mine is Gen2. It’s good, no problems. I don’t have a Kickr Climb and am not interested in one. I wouldn’t get too caught up in how loud the trainer is – you’re deluding yourself if you think this is going to be a quiet endeavor. The fans you’re going to run and your drivetrain noise are probably louder than your trainer.
Many smart trainers have the ability to change the resistance automatically. In a structured workout it can set the resistance based on a target power – this is known as ERG mode. When not in ERG mode, then the trainer sets the resistance to try and simulate what you see in game – i.e. if you’re going up hill, it adds resistance, and if you’re going downhill it lowers the resistance. I personally wouldn’t buy a trainer without this feature. Not all smart trainers have it so be sure to double check.
There are other methods to “measure” your output with power estimations (known as zPower) which computes power based on a model of a dumb trainer’s resistance and it measures cadence or wheel rotations or something. If you only are planning to do workouts with Zwift this might work for you as relative power is really the only thing you care about. But if you plan on racing, then this method typically does not have good absolute accuracy so most races won’t allow your results to be published if you’re using this method. I would suggest sticking to a Smart Trainer, or at worst, a power meter on a dumb trainer. I will note that basic wheel-on fluid and magnetic resistance trainers have almost no ability to coast due to their small flywheel. Coasting is a really nice feature of the wheel-off direct drive trainers – especially in races. The large flywheel simulates real world riding much better and will save you energy in races. Note that if you do decide to use a power meter that some older power meters are ANT+ and may require a dongle for your ipad or laptop in order to connect to them. Newer power meters support bluetooth and should be able to connect to most modern laptops and tablets.
Console: (Like a computer or tablet) I use an ipad because I already owned one. It has Bluetooth connectivity so I can connect all of my Bluetooth sensors. Use whatever tablet, PC, laptop, mac, or phone you have and see how that works out for you to get started before buying something else. You don’t need a beastly gaming rig to run Zwift – it’s not graphics intensive.
A desk thing: I have one of these trainer desks, which I put my ipad on. There are other products like it. This one was cheaper than the Wahoo one and it does what I need. My teammate uses a music stand. Or just use your TV in your living room and forgo the desk.
A mat: You don’t need a front wheel riser block on a direct drive trainer like you do for a wheel-on trainer, but you will want a mat. This is the wahoo one, you can probably find something cheaper. I think I got mine on clearance from performance bike a while ago. Maybe something like this will work. I sweat, spit, snot rocket, etc all over my mat and would have completely destroyed my carpet long ago without it.
Fans: You’ll need some airflow as well to keep you cool. I run 3 fans. I think it’s better to have the fans at a slight angle to your body rather than directly head-on because the air hits more surface area of your body to keep you cooler. Basically your profile is larger at an angle than straight on. I started with just a single box fan that I leaned against one of the legs of my desk. I upgraded by adding a second fan, which is a 15″ honeywell fan that can swivel. The 15″ one has way less airflow than the box fan but I can actually control the angle on it instead of leaning it against something so I use them both at the same time – one pointed at my body and one pointed at my head. This is a smaller version of my 15″ fan, I recommend something bigger and more powerful though. A $20 box fan from home depot is a good start – bonus if you can control the angle. More recently I picked up a third pedestal fan because it was on sale.
Fan Remotes: When you first get on your trainer and you’re not warmed up yet the fans are cold and annoying. I like to start with them off, then turn them on about 5 mins in with a remote control like this. This product comes with 3 outlet switches and the remote, so I have my trainer on one switch, and the fans on the other two switches and the remote just stays on my trainer desk
Cadence sensor: You’ll want a cadence sensor, this is the one I have. Some workouts prescribe certain RPMs to work on specific muscle fibers or to just mix it up and make it less monotonous. I clip it onto my shoe, but you can also attach it to your crank.
Heart Rate Monitor: You’ll want a HRM if you’re racing. Most races will disqualify you without heart rate data. I have this armband one which I like because it’s really easy to slip on and off unlike the chest ones. I learned later that this is not a “high accuracy HRM” which means you can’t measure Heart Rate Variability (HRV) with it, but that may not interest you anyway – HRV is a niche piece of training data without a ton of research around it anyway. Some people use HRV as a measure of how rested you are.
Auxiliary entertainment: I’m also usually listening to music while riding. The in game music and sound effects get old quick. During workouts I usually have a Netflix movie/show going on my phone.
Budget: Before you go out and buy a bunch of stuff – start by using whatever fan or desks or whatever you have already and see what works for you. Zwift is on Android now (and iphone too I think) so you can always start by just mounting your phone on your bike or something. I have found it’s a bit trickier to get all my devices to sync to my phone than to my ipad though for some reason.
Bike: Use whatever bike you want. One thing to watch out for is the corrosion that can happen to your bike from sweat. The sweat will drip on stuff and fuse things together. This isn’t usually much of a problem outdoors because you’re moving forward outside and the sweat hits the person behind you instead (I’ve taken a few Ramsey Foster sweat showers in my day…). I more or less destroyed my carbon road bike frame from sweating directly on the metal to metal junction where the internal rear brake cable routing fused to the brake cable. When I tried to yank the cable out it pulled the aluminum grommet out with it. I then had to chip out the rear aluminium grommet because the brake cable snapped when I pulled the front grommet out, so now there’s just 2 big holes in my frame that I ran full length housing through and secured with electrical tape. It looks dope. I think it’s really aero too because I had a great Driverway Series on it in 2019… There are products like this thing that help to catch sweat from dripping on your bike. Hand towels go a long way to help keep too much sweat from dripping on your bike but if you’re working hard you’ll be wiping a lot. Be sure to take the bike off the trainer once every few weeks or days to hose it off and get some fresh chain lube on there too.
That’s enough about hardware. Let’s talk about the game.
Step 1: Link Strava and Register with ZwiftPower
Install the game, connect your sensors, link Strava and any other apps you use, and create a Zwiftpower.com profile. Zwiftpower.com is the governing body for the races. The rules vary in each race (you can read race rules in the Zwift companion app, more on that below), but most of the races will disqualify you if you don’t have heart rate data, so a HRM is a must if you want to have your results show up in your races on zwiftpower.com. Zwiftpower is not part of the actual Zwift corporation. I think it’s just some really passionate people that developed this cool tool in their free time, but is also now the defacto race authority in the zwift community. It’s as necessary for Zwift as Strava is for cylcing in general. (If it’s not on Zwiftpower.com did you even race?) You can even join team YEAH! on Zwiftpower as well if you’re so inclined. Or make a team for your own crew!
Step 2: Install the Zwift Companion App
The Zwift Companion App is where you can look at upcoming group rides, group workouts, and races. It’s your ticket to riding organized events on Zwift. Download and install it on your phone. You can register for events from the companion app, then when you’re in game later riding around it will notify you the event is starting and take you to that event instance automatically. While in game, the companion app also acts as a remote control for the game (your Zwift game device and phone have to be on the same WiFi network for it to work). Through the companion app you can trigger power ups, do u-turns, and even chat in game – all from your phone instead of your laptop or ipad.
Step 3: Measure your FTP
All of the workouts (and your race category) in game are based on your FTP (functional threshold power). You need to measure this number. Theoretically, it’s the amount of power you can sustain for an hour. Zwift has a 20 min FTP test to estimate your FTP for you, so that workout is one of the first things you should do. Typically these shorter FTP tests tend to overestimate that number in practice – but that’s okay because this number is just used as a baseline for the workouts and the workouts are calibrated against that shorter FTP test. They added a ramp method as well which is similar to what trainer road uses – this is another method to try and estimate the same thing, I think it takes even less time to get to a FTP number with the ramp method. Pick one method and stick with it, or try both, (with a few days of rest in between) to see how the numbers compare if you’re curious.
Step 4: Ride
Whether it’s structured workouts, training plans, races, group workouts, group rides, free rides, or meet-up rides, there are a lot of ways in Zwift to play. Try different ride types to find out which suits your style.
Free Ride
You don’t have to do a structured workout or an event, you can just ride around in one of the many zwift worlds. There are several different worlds ranging from made up places like Watopia, to “real world” places like New York or Innsbruck. There’s also several temporary jerseys you can earn – such as a green jersey for being the fastest person (in that instance and online at that moment) to do a sprint section (green gates). Or a polka dot jersey for being the fastest to climb a hill. Or an orange jersey for being the fastest around a circuit. There are no lasting benefits to earning these jerseys, it’s just a fun ego boost and something to help keep your interest while wandering around.
While in free ride mode you can choose which direction you want to go when you get to an intersection. This is helpful if you’re trying to get to a specific place, like the Alpe du Zwift, or if you’re just trying to avoid or find hill climbs.
Registering for a race (or event): After doing your FTP test you should have a pretty good idea of your Watts per Kilogram threshold. Follow this link to find out how to register for the category for which you tested in. You can do it from the companion app or from the Zwift home screen. I prefer to use the companion app as there is more information available about the event such as distance, course profile, and any other special rules about the event.
When you create your avatar you have to enter your height and weight. Please be honest about these things – weight affects your W/kg, which determines the speed your character goes up hill. Heavier characters will descend faster though so there’s benefits to all cycling body types. If you’re a heavier rider worried about your power to weight ratio then look for flatter races where absolute watts matter more than power/weight ratio. Play to your strengths. Height will actually have an impact on your drafting efficiency as well.
Some races are scenario based or have other special rules – such as the ‘fox and hounds’ race format where the different categories have staggered starts and the goal is to work with your category to catch up to the other groups and avoid getting caught by the groups behind you. Be sure to read the race description in the companion app to fully appreciate the race format.
Racing
Most races start hard, especially mixed class races. the A’s typically try to shake out the lower category riders right at the beginning. Don’t be surprised when there’s no neutral roll-out. Be prepared to hammer for about 30-45 seconds. You probably don’t want to lead this out, but just try not to get separated from the front group at this point.
Try to minimize the work you’re doing during the race by drafting efficiently. You don’t need to put out as much power as the guy pulling – you’ll start to get a feel for how many watts it takes to stay with the group. Drafting is “sticky” in that you won’t pass someone if you’re doing the same wattage as them, or even slightly more. It’s easy to over do it at first until you figure out how this “sticky drafting” works. You have to overcome a certain threshold before your character will move around another rider.
A good strategy in Zwift racing is not to try and attack to go solo, but to go just hard enough in your attacks to incentivize a few (or most) people to come across with you. You want make it hard enough so that you’re consistently shedding people in ones and twos throughout the race with each attack so they can’t really organize into a big peloton and catch your “break”. A true break vs peloton rarely happens in Zwift. By shedding a few at a time you keep the largest group at the front which helps to share the work load and ensure that those that got dropped won’t be able to catch back up.
Be careful to stay within yourself on attacks – if you have nothing left when the counter attack comes you’ll get dropped as the peloton catches you and blows by. Attacks are more likely to have an impact when done on hills, turns, rollers, or anything where it’s not flat or downhill. Turns are a fun place to attack because it’s more difficult for others to see you pulling away since the game makes everyone’s avatar take weird lines through turns. Pedaling through and over the tops of hills is also a great place to catch people off-guard, as (just like in real life) many people stop working at the top of the hill.
The benefit of drafting is greatly reduced on uphill sections, which is why many people prefer to attack on hills. Hills are more of a power/weight vs power/weight competition so it’s easier to drop people on hills that are relying on staying with the group by purely just wheel sucking.
If you’re more of an FTP guy and less of a sprinter then get rid of as many sprinters as you can before the finish line by doing longer sustained effort attacks and stringing the group out as much as you can.
If you’re more of a sprinter then you’ll want to focus on staying in the lead pack and drafting efficiently. Play to your strengths on sprints. If you have a good 1 minute power then you’ll want to try to get a gap around .5 to .4 miles remaining and go hard until the end. This is risky though because if you don’t jump hard enough and stick the gap and someone catches your wheel they will certainly be doing less work than you and you’ll end up just leading out someone else’s sprint. If you’re better at the 15s efforts then start to watch those 1 minute power guys that will jump from far out like a hawk with about 1 mile to go in the race and make it your goal to hop on to anyone’s wheel that tries to jump before your target sprint point of around .2 miles or ~1000ft.
Power Ups
If power ups are allowed in your race (some races turn them off) then be sure to use them wisely to gain an advantage.
You’ll notice that when you go through certain gates on the map (whether you’re free riding or in a race) that you might get a power up or bonus experience. The prize you get is random. It’s a bit like Mario Cart. You can use powerups to give you a temporary advantage. There are three different power ups you can get in the game: the aero helmet, the truck, and the feather.
Aero Helmet: This reduces the amount of wind resistance that your character experiences in game significantly. I.e. for the same wattage you will go faster. It is best to use the helmet power up in a sprint or on an attack when you need to build a gap and won’t have anyone to draft on.
Truck: The truck is a drafting bonus. Using the truck reduces the amount of energy you have to expend to stay in someone else’s draft. If you are not drafting on someone else, then like the helmet power up, it also just reduces your wind resistance and lowers the amount of watts you need to expend to go the same speed. The truck is not as good as the helmet for pulling or sprinting. It’s best to use the Truck power up when you’re able to draft on someone and you are gassed and need some additional time to recover. You can also use a truck power up in a sprint like you would use a helmet power up – but you’re probably better off not trying to lead that sprint out with it if you don’t have to.
Feather: The feather power up makes your character weigh less, effectively improving your power to weight ratio for a short period of time. It is best to use the feather on an uphill section. You can use the feather to either reduce the amount of energy you need to expend to stay with the peloton, or, my favorite, to attack on the hill and cause maximum pain to the other riders in your group. Note that using a feather on a downhill section will likely be detrimental as heavier avatars descend faster.
In-Game Equipment
Not all bikes and wheel sets are created equal. They all have different weight and aero properties which effect the speed your avatar goes for a specific wattage. You can access gear selection from the pause menu in game under the “Garage”. You can’t change wheels or your bike while your avatar is moving.
You can find lists of the best climbing bikes/wheels or the best aero bikes/wheels, but one of the most well rounded bikes in the game is the Tron Bike (real name is Zwift Concept Z1 but everyone refers to it as the tron bike), and to get it you have to select the Everest challenge from the pause menu in game (and then ride a lot of elevation). I think the default challenge is the California challenge which is a distance challenge rather than elevation. I recommend changing this to Everest challenge until you get the tron bike. When you beat the “level 1” Everest challenge then the real fun begins – you actually have to ride the height of Everest x4 to get the bike. You basically ride to outer space.
They added an in-game store, called the drop shop, where you can spend sweat equity known as “drops” to buy better gear. Some gear is unlocked when you level up and some gear you have to earn through special challenges or events. Some of the best wheels you have to earn by climbing to the top of Alpe du Zwift and then landing on the wheel set in a wheel-of-fortune style lottery wheel.
Training Plans and Structured Workouts
There are some good training plans (and some not-so-good ones) built in to the game. I’ve used the “Build Me Up” one which targets about 5-8 hours a week of workout material. This one is better than most of the others in my opinion because it has more mental stimulation tricks built-in – like motivational prompts or changing cadence targets to mix it up. I also found the workouts in this plan to be more appropriately challenging than some of the workouts in other plans. There are due dates for every workout and it only unlocks a few workouts at a time. Every time you log into the game it will show you your training plan and which rides are available and when they are due. From there you can select one of the available workouts or just skip it and do whatever you want. There’s no penalty for skipping a workout, but it’s motivating to try and do them all if you can, and having the reminder every time you log in is helpful too. I’ll sometimes skip a workout in favor of a Zwift race or a ride outside.
If you’re not ready to commit to a whole training plan but still want to get in a structured workout I recommend the Zwift Academy workouts. They’re quite challenging and have good motivational prompts. Of course you can never go wrong with a classic 2×15 or 2x20min FTP workout as well. All of these and more you can find in the workouts menu. Take note of the Training Stress Score (TSS) of a workout as that will give you an indication of how difficult the workout will be. A score of 100 would be the equivalent of holding FTP for 1 hour.
While the training plans and workouts in Zwift are decent, you’re probably better off with a coach if you have real aspirations of making fitness strides. Many coaches these days can send you workouts through Zwift and other popular platforms. If you’re in the Austin area consider experienced local coaches and racers like Stefan Rothe with Rothe Training, Dave Wenger from Durata Training, or for mountain bikers Nathan Winkelmann with Winklemann Training Fundamentals
Happy Zwifting!

Great article – thank you!
LikeLiked by 1 person
Awesome summary and thanks for the mention! Ride on!
LikeLiked by 1 person